How to feed ADS-B data to ADSBHub?
ADS-B data sharing with ADSBHub is easy. First, you have to operate your own ADS-B receiving station. It can vary from a cheap $20 TV tuner dongle to a professional ADS-B receiver. After your ADS-B station is live the process of joining ADSHub takes just few minutes and after proper configuration you will see your data at our stats page. Just follow the steps below. It is not a problem if you want to feed many ADS-B related sites simultaneously.
- Step 1 - Registration
- Step 2 - Adding your ADS-B station to ADSBHub
- Step 3 - Configuration of your ADS-B receiver/software
Step 1. Registration
- Open https://www.adsbhub.org/register.php and fill your registration data.
- After submitting registration form, you will receive an email message with an activation link. Click on the link or copy it into your browser to activate your account. If you do not receive the activation message please check your Spam folder. If you still have problems send us a message via our contact form and we will take care for your registration.
- The activation link will automatically login you to ADSBHub. You can also login manually by entering your email and password.
- After login click on “Settings” button and check your profile data. Your nickname is the only personal information which will be visible to public. We do not share any of your personal details!
- Section “Data Access” below your profile data contains the IP addresses which you will use to access ADSBHub services and retrieve the aggregated feed. You can always change or add IP addresses (up to 4).
Step 2. Adding your ADS-B station to ADSBHub
Open ADSBHub (
www.adsbhub.org) with your browser and login to your account.
Click on “Settings” button.
Next to your “Profile” tab you will see “New Station” tab. Click on it.

Enter the following data:
- Station name – the name of your station, very useful if you have many stations added to ADSBHub.
- Country, Location – the place where the station is located (name of the city, airport etc.)
- Latitude, Longitude – we need these coordinates to calculate and display statistical data of your station correctly
- Feeder Type – upon your choice
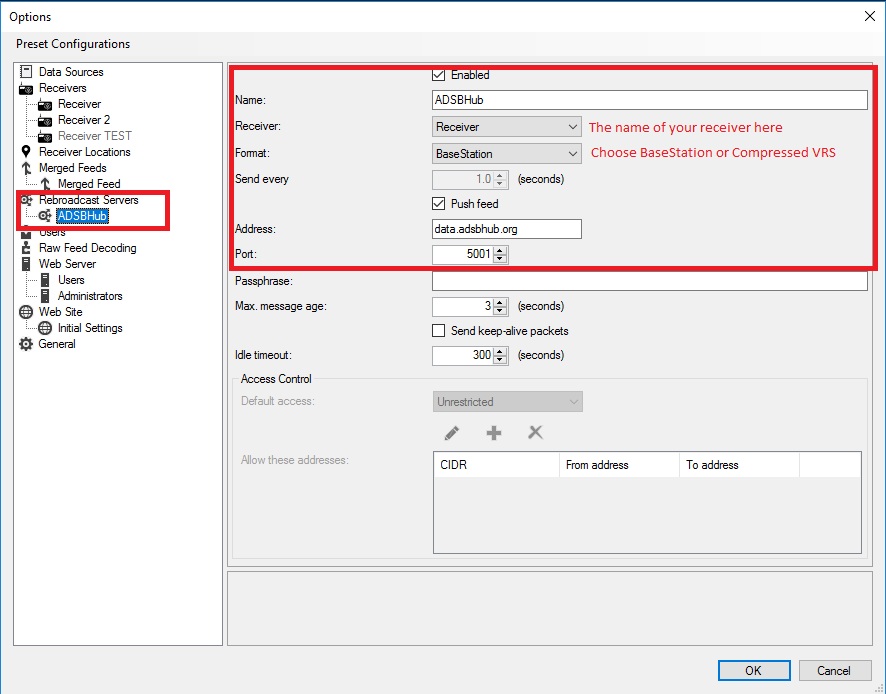
- Data Protocol – Raw, SBS or Compressed VRS depending on your station protocol. If you use Virtual Radar Server we recommend Compressed VRS for bandwidth saving.
- Station mode – Client or Server (please read Step 3. for more details)
- Station Host(IP) – IP address or host name of your station
- TCP port – for server mode we need the TCP port of your station
After clicking on “Save” button your station will be added to your account. You will be able to check its operation on the “Statistics” page.
 "Station dynamic IP update ckey"
 is needed to automatically update your IP when it is changed by ISP. You use ckey in Step 3.
Step 3. Configuration of your ADS-B receiver/software
ADSBHub currently supports incoming raw Beast hex format or SBS/30003 data. Your station may act as TCP client or server.
In client mode your station has to create TCP connection to
data.adsbhub.org , TCP port 5001 and start streaming. For security reasons
we require the IP address (or hostname) of your station to be correctly set in our database (see next section). If you do not have static IP address you can use any dynamic DNS service and to provide us your DynDNS hostname.
In server mode you should provide your static IP address and TCP port and we will take care to create
TCP connection to you. After establishing the connection your station should start streaming.
Don’t forget to enable incoming TCP connections from data.adsbhub.org in this case!
For expert users the information above is enough to start streaming. Below you will find some of the most common configurations.
Raspberry Pi or Linux box with dump1090 (or PiAware)
- Download and install ADSBHub client
sudo su -
sudo bash
cd /usr/bin
wget https://www.adsbhub.org/downloads/adsbhub.php --no-check-certificate -O adsbhub.sh
chmod 755 adsbhub.sh
- Check you ckey
cat adsbhub.sh | grep "ckey="
If your ckey is not configured automatically (i.e. it is an empty ckey=' '), please edit adsbhub.sh and add "Station dynamic IP update ckey" from Step 2. between quotes.
- Start ADSBHub client
/usr/bin/adsbhub.sh &
- For automatic start of ADSBHub client after reboot edit your /etc/rc.local file and add before 'exit 0'
nano /etc/rc.local
Go to line before 'exit0' and add:
 /usr/bin/adsbhub.sh &
Save and Exit:
 Ctrl+O Enter Ctrl+X
- To be sure that /etc/rc.local is executed during startup
chmod +x /etc/rc.local
wget https://www.adsbhub.org/downloads/rc-local.service --no-check-certificate -O /etc/systemd/system/rc-local.service
systemctl enable rc-local.service
Virtual Radar Server (VRS)
Start your Virtual Radar and select “Tools” / “Options” from the main menu. You should set the configuration shown on the next screenshot: